
Practice Panther Integration Guide
Part 1: Enabling the Practice Panther Integration
Step 1: Access the Integrations Tab
- Click your name in the top-right corner.
- Select Administrator Panel.
- Click the Integrations tab (sixth tab from left to right).
- Scroll to the bottom of the page.
- Locate the Practice Panther Integration section.


Step 2: Connect to Practice Panther
- Click the green Connect button.
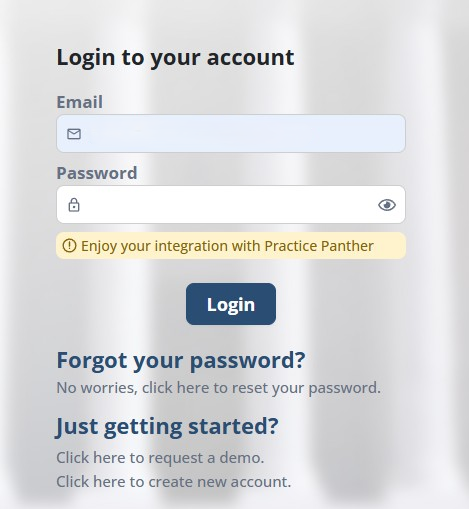
- You will be prompted to enter your Practice Panther credentials.
- Log in using your credentials.
- Grant permissions for Prima.Law
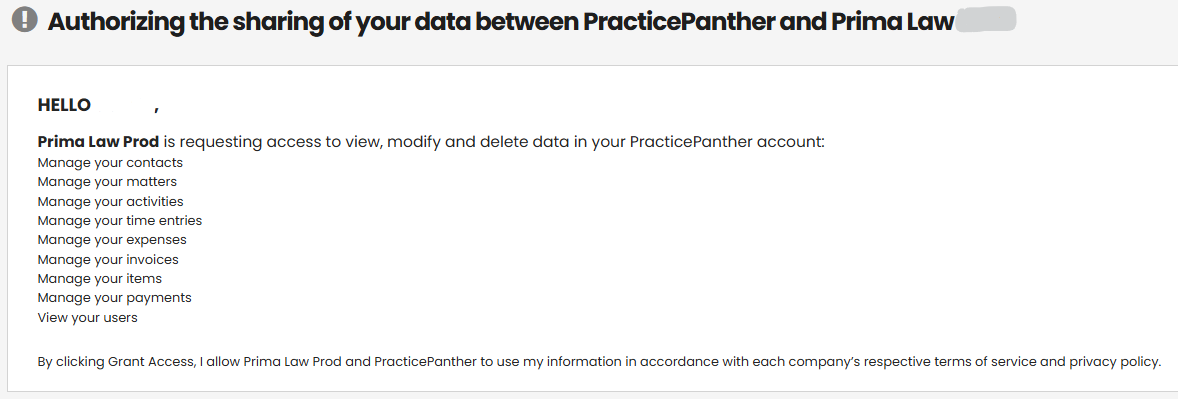
- You may be prompted to log out of Prima.Law.
- Log back in.
- Return to Administrator Panel → Integrations → Practice Panther.
Step 3: Review Integration Options
Once connected, you will see:
- Disconnect
- Custom Fields

Part 2: Managing Custom Fields
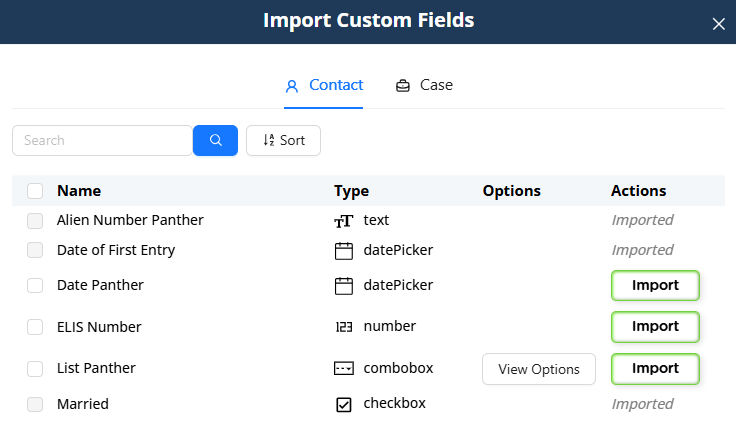
Importing Custom Fields from Practice Panther
- Click Custom Fields.
- You will see all custom fields from Practice Panther.
- Select the fields you want to import using the checkboxes.
- Click Import.
If a field has already been imported:
- It will display as Imported.
- The Import button will not appear.
You can:
- Sort by name, type, or options.
- Search by field name.
- Bulk import multiple fields at once.
Both:
- Contact custom fields
- Matter/Case custom fields
can be imported and will appear in Prima.Law accordingly.
Part 3: Importing Contacts from Practice Panther
Important:
You cannot import matters alone. Matters are tied to contacts.
You must import the contact first.
Step 1: Search for a Contact
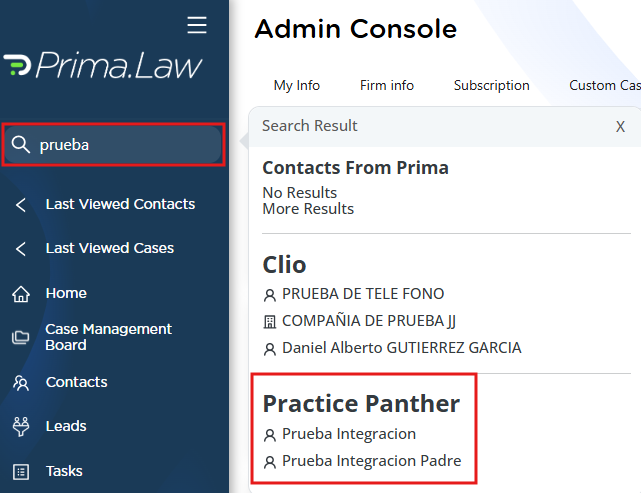
- Go to the Prima.Law search bar.
- Type the contact’s first name (or first and last name).
- Do NOT press Enter immediately.
You will see:
- Prima.Law contacts (top list)
- Practice Panther contacts (bottom list)
If a contact has already been imported:
- It will show (Imported) next to the name.
Step 2: Import the Contact
Click on a Practice Panther contact that is not marked as imported.
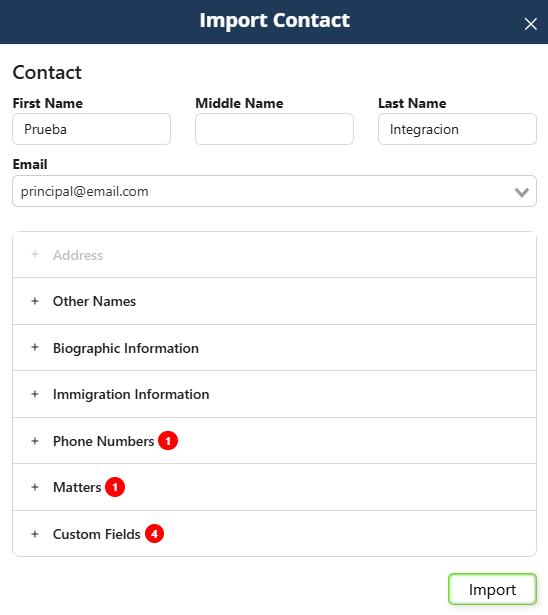
The Import Contact interface will appear.
You will see:
- First name, middle name, last name
- Addresses
- Other names
- Biographic information
- Immigration information
- Phone numbers
- Matters
- Custom fields
You can:
- Expand each section.
- Edit the information before importing.
- Choose which matters to import.
- Modify case names before import.
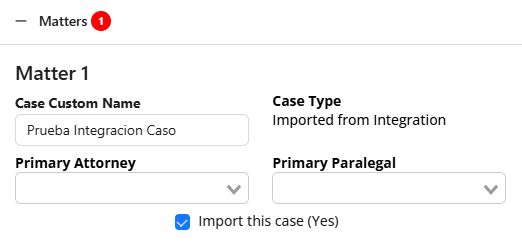
Important: Assigning Cases Properly
When importing matters:
- The case type will default to Imported from Integration.
- You can modify the case name before importing.
- You must assign:
- At least one attorney or paralegal.
You can also choose whether or not to import each matter.
Step 3: Complete the Import
Click Import.
You will be redirected automatically to the imported contact page.
You will also see a Go to Practice Panther button on the contact page for quick access.
Integration Updates Tab
On the contact page, next to the Tasks tab, you will see:
Integration Updates
If changes are made in Practice Panther:
- Notifications will appear here.
- You can choose whether to import those updates.

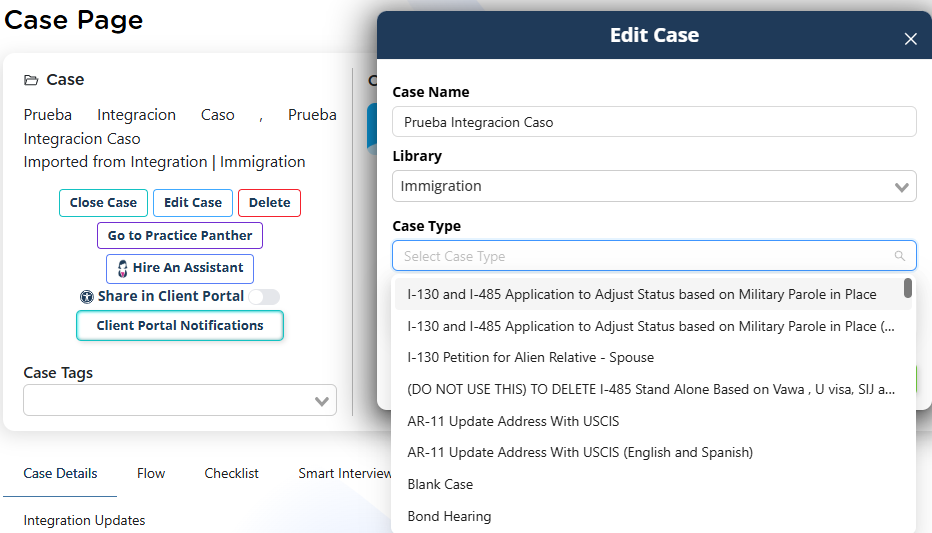
Part 4: Assigning the Correct Case Type
Any imported matter will initially have the default case type:
Imported from Integration
Before beginning casework:
- Open the imported case.
- Click Edit Case (below the case name).
- Select the appropriate library (Immigration, California, etc.).
- Choose the correct case type from the dropdown.
- Save changes.
Important:
Changing the case type resets checklist items and forms.
Always assign the correct case type before beginning work.
Once assigned properly:
- The checklist will populate.
- The forms list will populate.
- The workflow becomes fully functional.
Who Is This Integration For?
This integration is ideal for firms that:
- Already use Practice Panther.
- Want advanced Immigration or California form libraries.
- Want powerful autofill and reverse autofill tools.
Important:
Prima.Law does not require Practice Panther to function.
Prima.Law is a complete case management and forms solution on its own. The Practice Panther integration is optional and designed to enhance workflows for firms that already operate in both systems.