
Billing & PrimaPay+
Prima.Law includes built-in billing tools to help you track time and expenses, generate invoices, build payment plans, and keep a clean transaction ledger per case and across your entire firm. If you want to process credit card, debit card, and ACH payments directly inside Prima.Law (including through the Client Portal), you can apply for PrimaPay+ through our payments partner Confido Legal.
This guide is step-by-step and covers both:
- Basic billing (no payment processing inside Prima.Law)
- Full billing + payment processing (PrimaPay+)
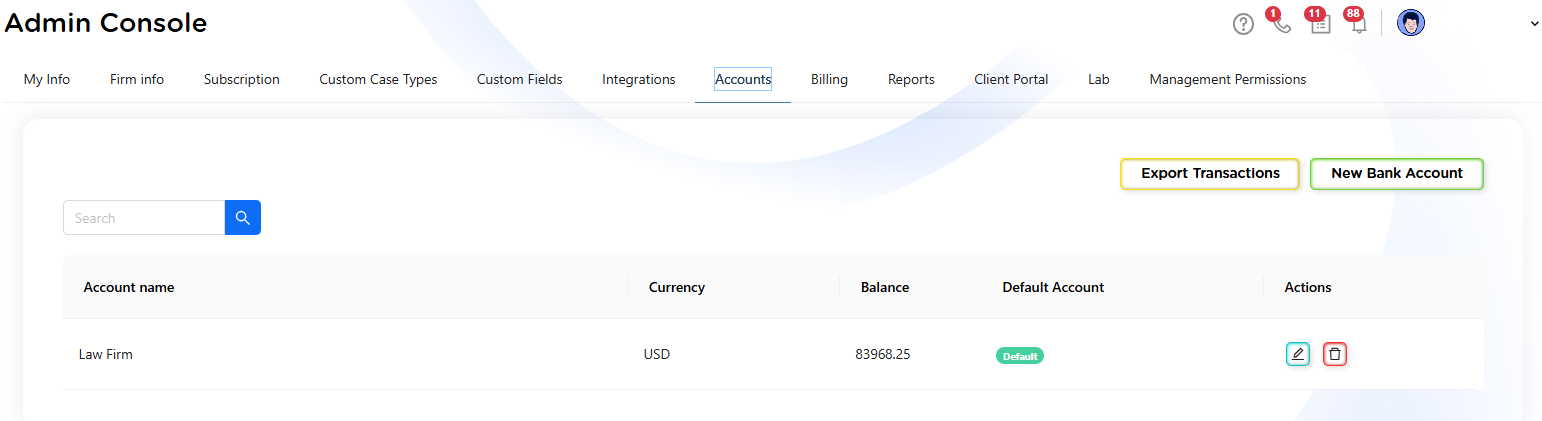
1) Before You Start: Add a Bank Account (Admin Required)
Whether you plan to:
- only create invoices/payment plans and log cash/check transactions, or
- process payments through PrimaPay+,
you must add at least one bank account in Prima.Law first.
Add a Bank Account
- Click your username (top-right corner).
- Click Administrator Panel.
- Open the Accounts tab (tab #7 from left to right).
- Click New Bank Account.
What you’ll enter
- Type: Operating or Trust
- Account Name
- Account Holder
- Institution
- Branch
- Account Number
- Transit Number
- SWIFT Code
- Currency: for reference (typically USD)
- Default Account: optional (recommended if you have multiple accounts)
Tip: If you only add one bank account, it becomes the default automatically. You can add multiple accounts later.
Once a bank account is saved, you can begin using billing tools inside cases.
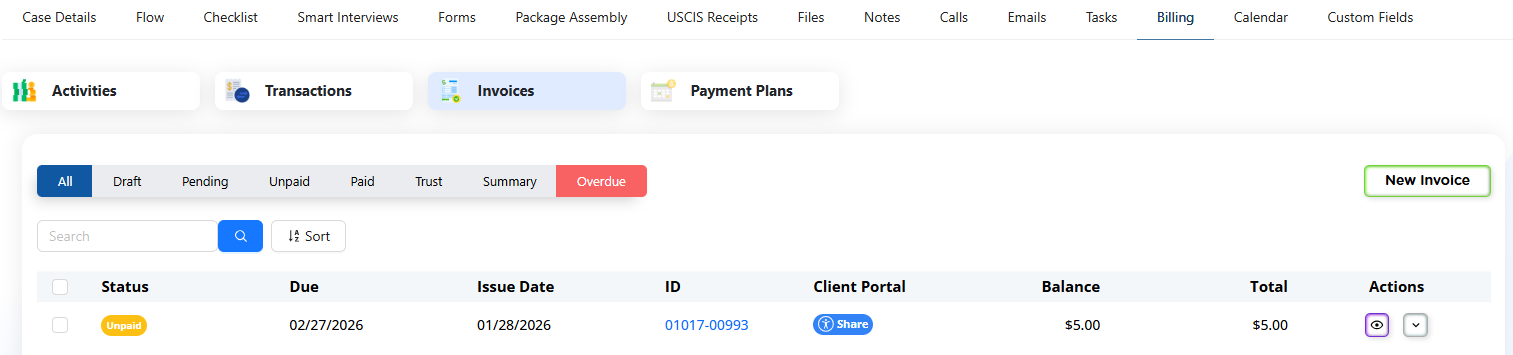
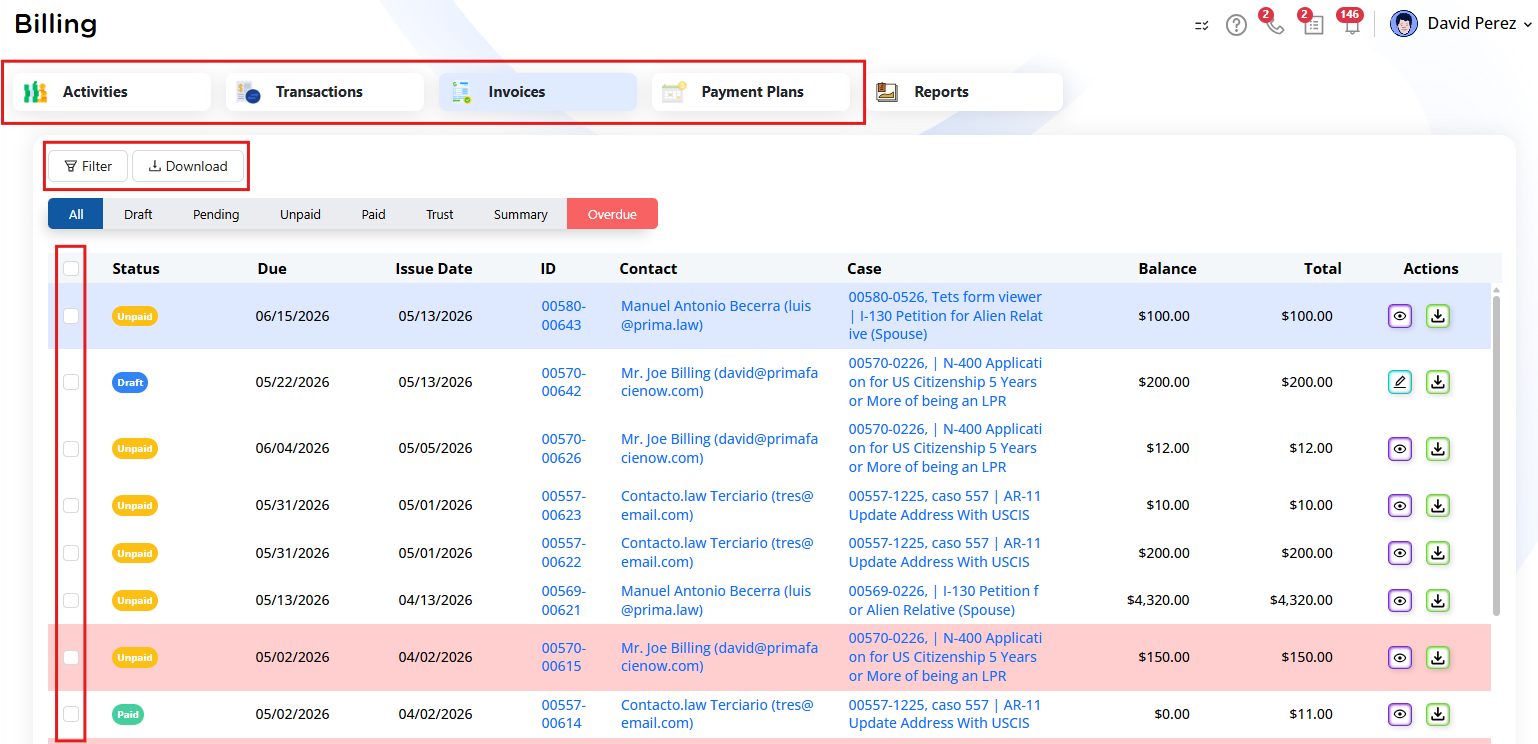
2) Where Billing Happens: Inside a Case (Billing Tab)
Billing is case-based. To create invoices, payment plans, or log billable activity, you need a case open for the client.
Navigate to Billing in a Case
- Open the client’s contact.
- Open any case for that contact.
- Click the Billing tab (right before Calendar).
Inside Billing you’ll typically see sections like:
- Activities (Time & Expenses)
- Transactions
- Invoices
- Payment Plans
- Payment Methods (appears when methods are stored)
3) Activities: Time Entries and Expense Entries
Activities are the building blocks you can later attach to invoices. You can log them whether you bill hourly, track internal effort, or need a clean history per case.
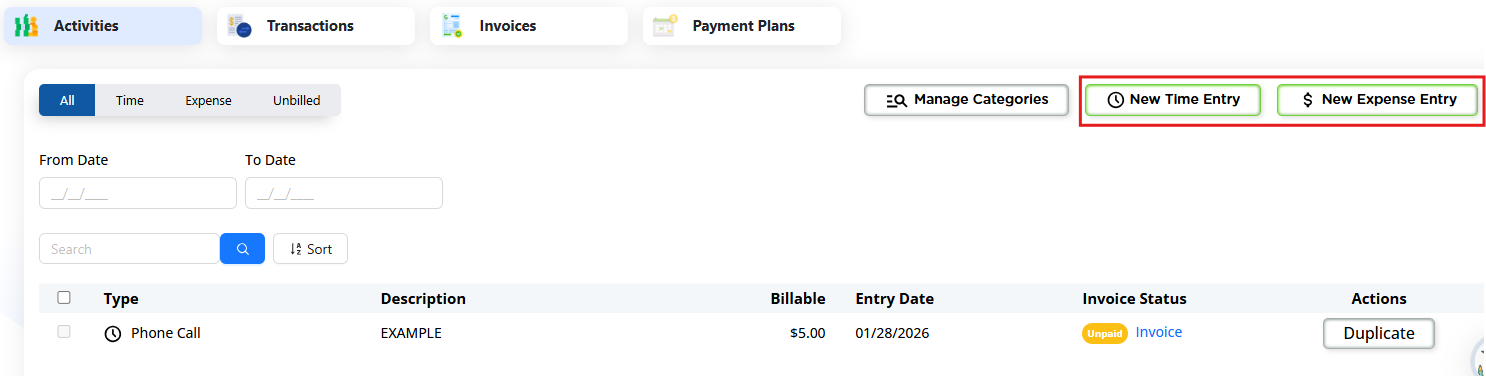
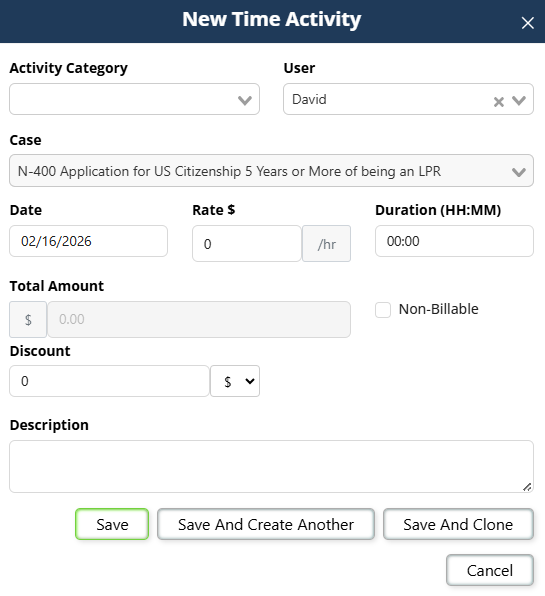
Create a Time Entry
- Go to Case → Billing → Activities.
- Click New Time Entry.
Complete the fields:
- Activity Category (choose or create one)
- User (who performed the work)
- Date
- Rate
- Duration
- Total (auto-calculated)
- Billable / Non-billable (checkbox)
- Discounts (percentage or fixed amount, if needed)
- Description (short but clear)
Save options:
- Save
- Save and Create Another (fast logging)
- Save and Clone (best when entries are similar)
Create an Expense Entry
- Go to Activities.
- Click New Expense Entry.
The layout is similar, but tailored for expenses (amount, category, notes, etc.). You can mark expenses billable or non-billable.
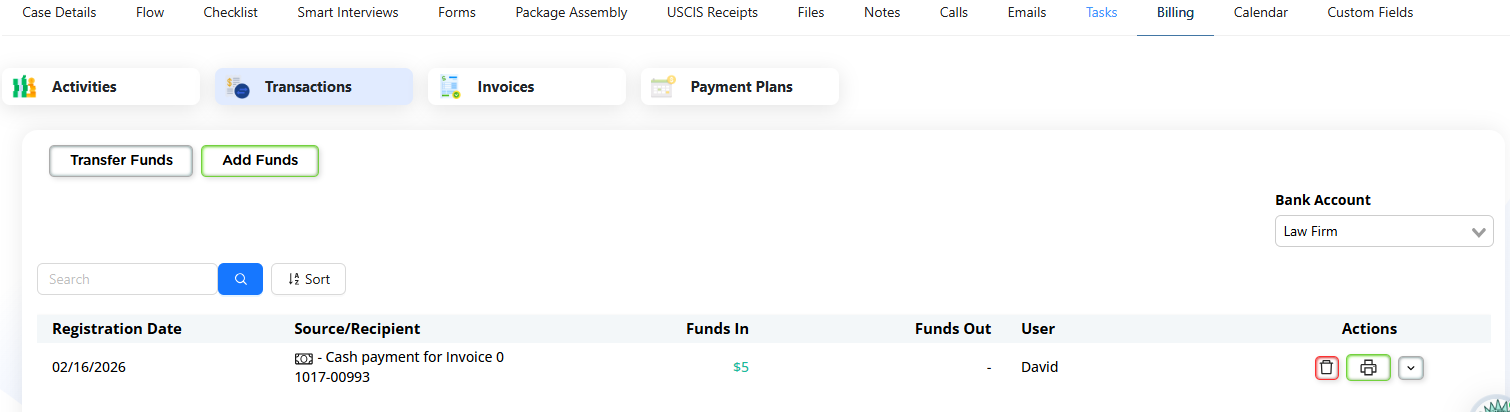
4) Transactions: Logging Payments and Movement of Funds
The Transactions tab shows recorded payments and fund actions linked to the case.
What you can do here
- Review all transactions tied to the case
- Filter by bank account (if you have multiple)
- Use sorting/filtering to find specific activity
- Add/transfer funds when applicable (depending on your configuration)
This is especially helpful if you log cash/check/money order payments manually.
5) Invoices: Creating, Approving, Sharing, and Recording Payments
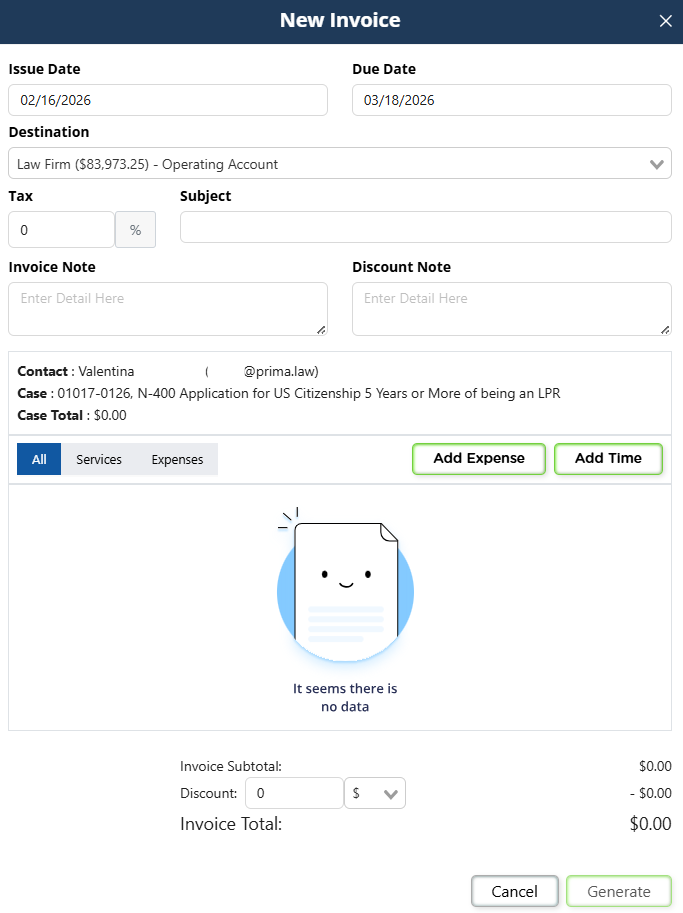
Create a New Invoice
- Go to Case → Billing → Invoices.
- Click New Invoice (top-right).
Fill in:
- Issue Date
- Due Date
- Destination Account (choose the correct bank account if you have multiple)
- Tax (if applicable)
- Subject (invoice title)
- Notes (optional)
- Discount (percentage or fixed amount, optional)
Add line items (two ways)
Option A (common):
- Create activities first (time/expenses), then select and add them into the invoice.
Option B (also valid):
- Create time/expense entries while building the invoice.
Both are supported. Pick the workflow that fits your firm.
- Click Generate Invoice.
After creation, the invoice appears in the list with:
- Status (Draft / Unpaid / Paid / Processing, etc.)
- Issue date
- Due date
- Invoice ID
Adding More Activities to an Existing Draft Invoice
You can add additional activities to an invoice as long as the invoice is still in Draft status. Once an invoice has been approved, activities can no longer be added or removed.
How to Add Activities to a Draft Invoice
If you need to include new activities after an invoice has already been created in draft form, follow this workflow:
- Delete the existing draft invoice
- Deleting a draft does not delete the underlying activities.
- All activities that were previously included in the draft will return to the Activities list.
- Return to the Activities subtab
- Go to the case → Billing tab → Activities subtab.
- Select all activities you want to include
- This includes both the original activities and any newly added ones.
- Create the invoice again
- Generate a new invoice from the selected activities.
- The invoice will now include the full, updated set.
Important Limitation
Once an invoice has been approved, it cannot be deleted or recreated. At that point, activities cannot be added or modified.

Approving Invoices (Admin vs Non-Admin)
Invoices must be approved before they can be charged/processed.
IMPORTANT NOTE: Once an Invoice is approved, it cannot be edited. Please make sure you are certain the Invoice was created correctly before arpproving, otherwise you will be locked out of editing it and you will have to void it and create a new one if mistakes were made.
- Admins can approve invoices directly.
- Non-admin users may need to send invoices to an admin for approval.
Recommendation: If a staff member is responsible for billing day-to-day, giving them the right access level avoids delays—unless your firm specifically wants admin-only approval controls.

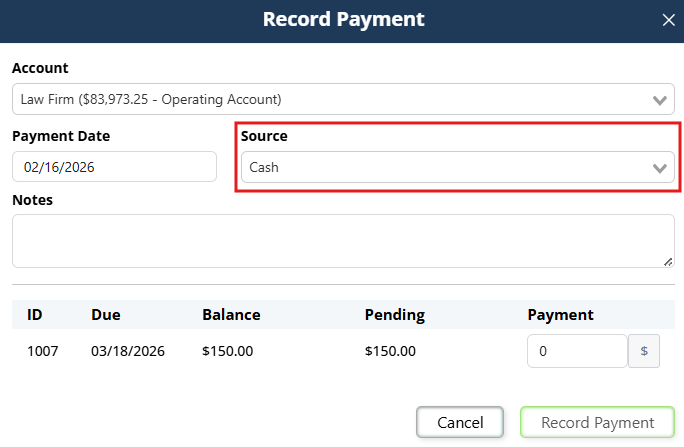
Recording a Payment on an Invoice
- In Invoices, locate the invoice.
- Use the eye icon to preview if needed.
- Open the Actions dropdown.
- Click Record Payment.
Set:
- Account (where the funds go)
- Payment Date
- Source / Method
Payment method options
If you do NOT have PrimaPay+:
- Cash
- Check
- Money order
If you DO have PrimaPay+:
- Credit card
- Debit card
- ACH / Bank transfer
(plus the manual options, depending on your setup)
Partial payments
You can record a partial amount. The invoice remains unpaid (or partially paid) until fully satisfied.
Payment status behavior
- Manual payment logging (cash/check/money order): status updates immediately.
- PrimaPay+ processing (card/ACH): status may show as processing, and typically settles in 2–3 business days. You’ll be notified of success or failure.
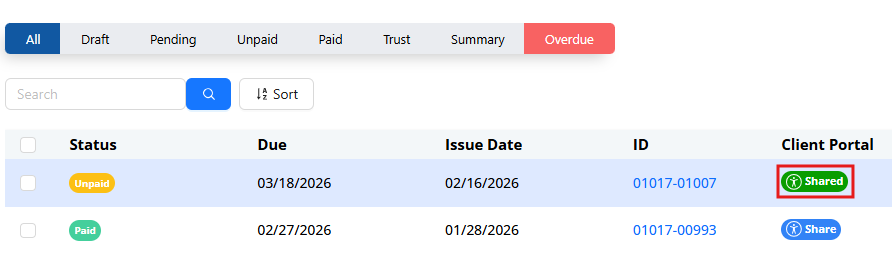
Sharing Invoices in the Client Portal
If the case is shared in the Client Portal, you can share invoices so clients can view them.
- Without PrimaPay+: clients can view invoices (if shared) but cannot pay inside the portal.
- With PrimaPay+: clients can pay invoices through the Client Portal.
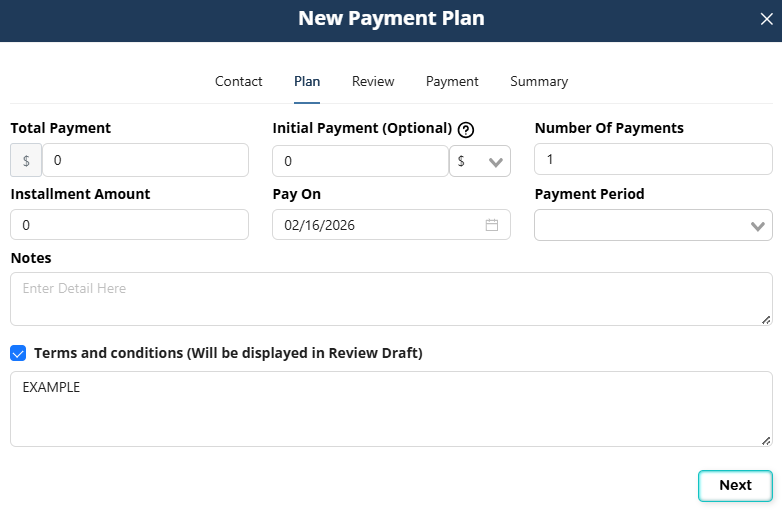
6) Payment Plans: Scheduling Payments Over Time
Payment plans are separate from activities and are designed to schedule payments and create installment invoices automatically.

Create a Payment Plan
- Go to Case → Billing → Payment Plans.
- Click New Payment Plan.
Step 1: Select the Paying Party
The paying party might be different than the main contact (example: petitioner pays, beneficiary is the case contact).
To select a different payer:
- The payer must exist as a related contact tied to the main contact.
Step 2: Plan Information
Set:
- Total amount
- Optional Initial payment
- If you add one, it can be charged immediately (depending on payment method).
- If you do not want an immediate charge, leave it blank.
- Number of payments or Installment amount
- First payment date
- Frequency:
- Weekly
- Every two weeks
- Monthly
- Semi-annual (every 6 months)
- Notes (optional)
Step 3: Terms & Conditions (Invoice Terms)
Before finalizing, confirm your terms are set.
Admins can configure billing defaults from:
- Administrator Panel
- Billing tab:
- Rates (attorney/paralegal rates + defaults)
- Invoice Terms (the text used on invoices/payment plans)
Step 4: Preview the Plan
You’ll see a preview with:
- Payment schedule
- Dates
- Amounts
- Terms & conditions
You can download a draft for internal review before final creation.
Step 5: Payment Method + Autopay
- Autopay is available only if:
- You have PrimaPay+, and
- the payment method is card or ACH
- If you log payments manually as cash transactions, autopay will be off.
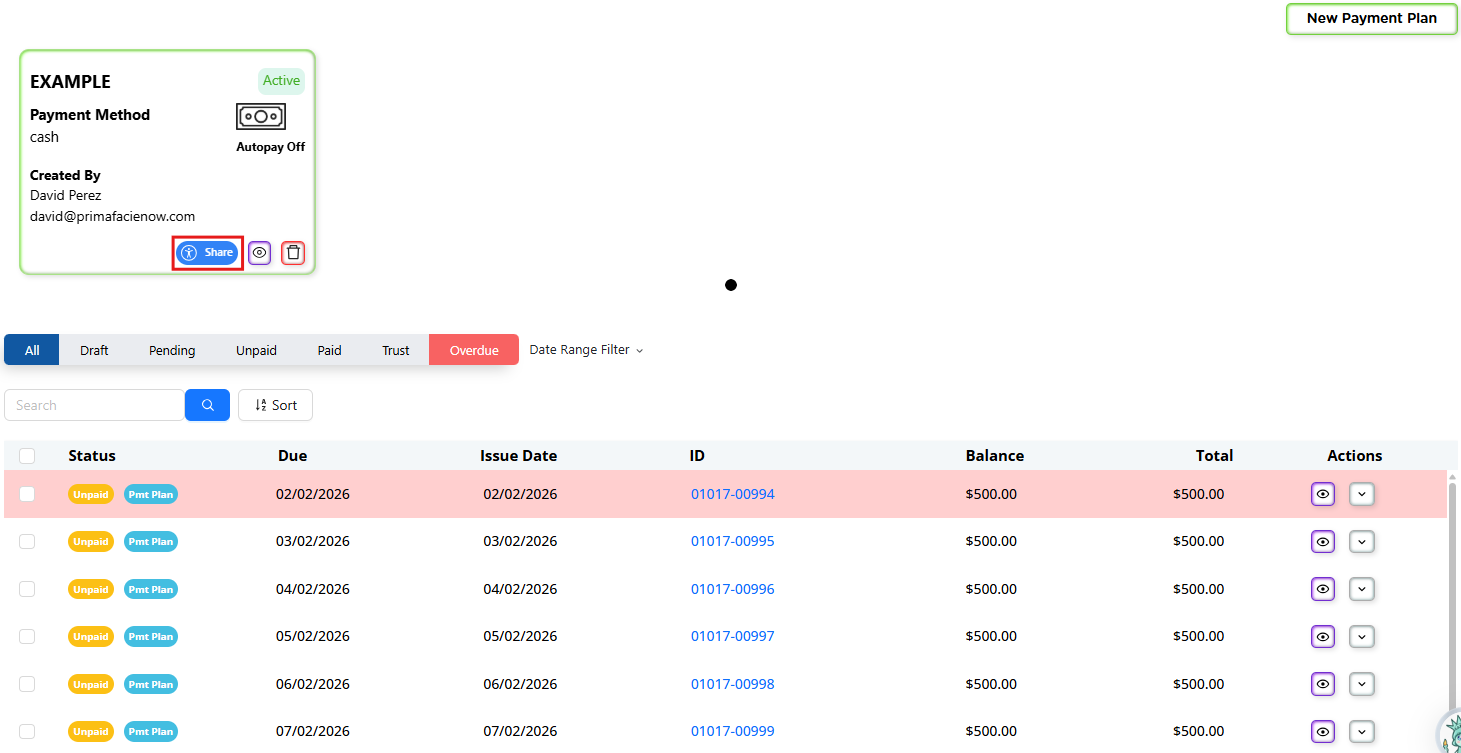
Finalize the plan. It will appear in the Payment Plans list.
Managing and Sharing Payment Plans
Inside the payment plan, you can:
- Review the schedule
- See the invoices created as part of the plan
- Download/print the plan document for signature
- Share it through the Client Portal (recommended when using portal heavily)
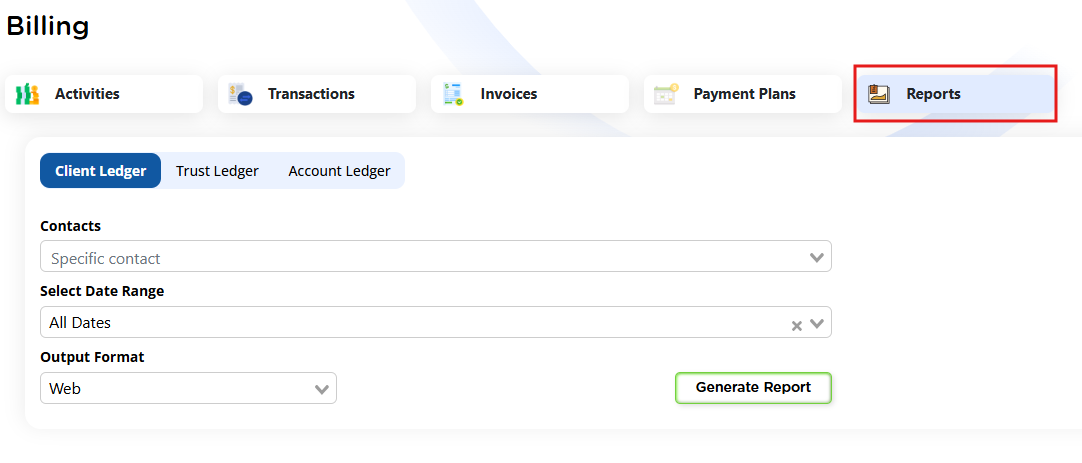
7) The Billing Hub: Firm-Wide Billing Overview
In addition to per-case billing, Prima.Law has a billing hub on the left sidebar for general review and reporting (payments can only be processed from the respective case page).
- Open the sidebar menu.
- Click Billing (under Custom Roles).
Here you can review across all cases:
- Activities (time & expenses)
- Transactions
- Invoices
- Payment Plans
You can filter, sort, and export reports (including Excel downloads for lists).
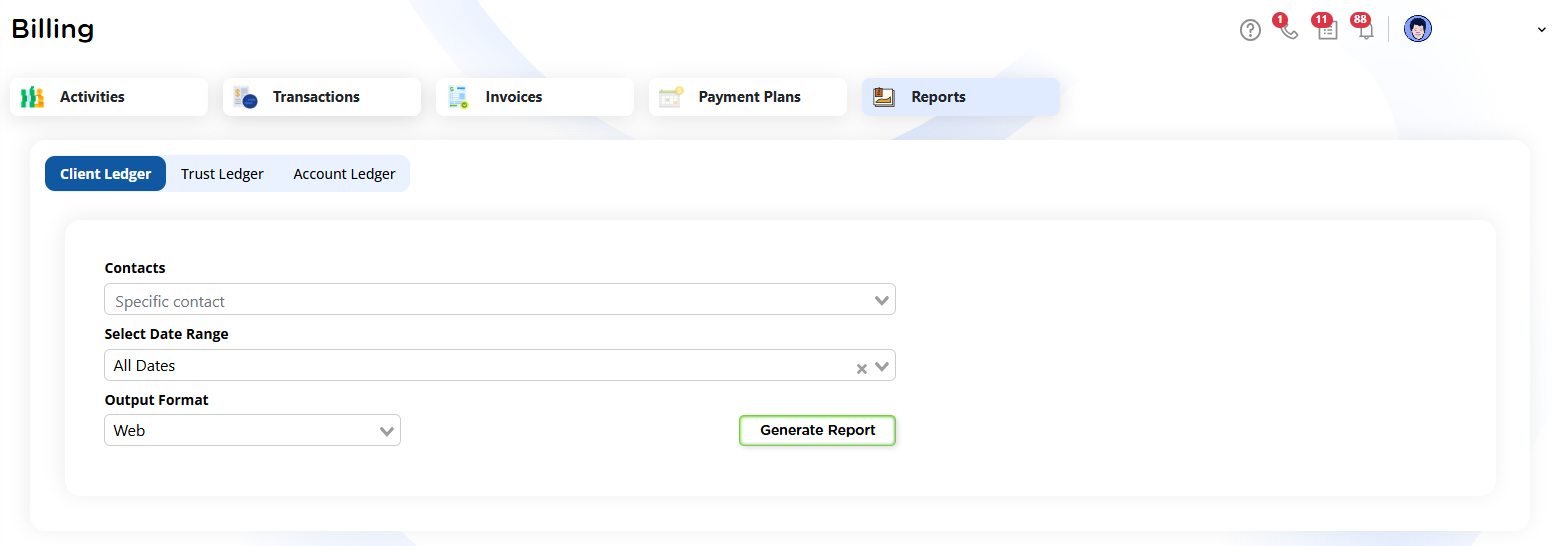
Ledgers and Reports
You can generate:
- Client Ledger
- Trust Ledger
- Account Ledger
Typical inputs include:
- Contact
- Bank account (trust or operating)
- Payment method
- Date range
- Output format (screen/web and/or PDF)
Downloading billing data from the Billing Hub
You can download lists of your billing records—such as activities, transactions, invoices, or payment plans—directly from the Billing Hub.
Accessing the Billing Hub
- Open Billing Hub:
Go to the left sidebar menu and click Billing. - Choose a tab:
At the top of the Billing Hub, select the relevant tab: Activities, Transactions, Invoices, or Payment Plans.
Selecting records
- Select items in bulk:
Use the checkboxes next to each row to select specific records, or use the header checkbox to select all visible records in the list. - (Optional) Filter first:
Click Filter to narrow down the list before selecting, if you only want to export certain records.
Downloading as PDF, CSV, or XLSX
- Open download options:
After selecting your records, click the Download button. - Choose a format:
Select your preferred file type: PDF, CSV, or XLSX. - Export the list:
The system will generate a file containing all selected records (or all records in the list, if you selected all) for the current tab.
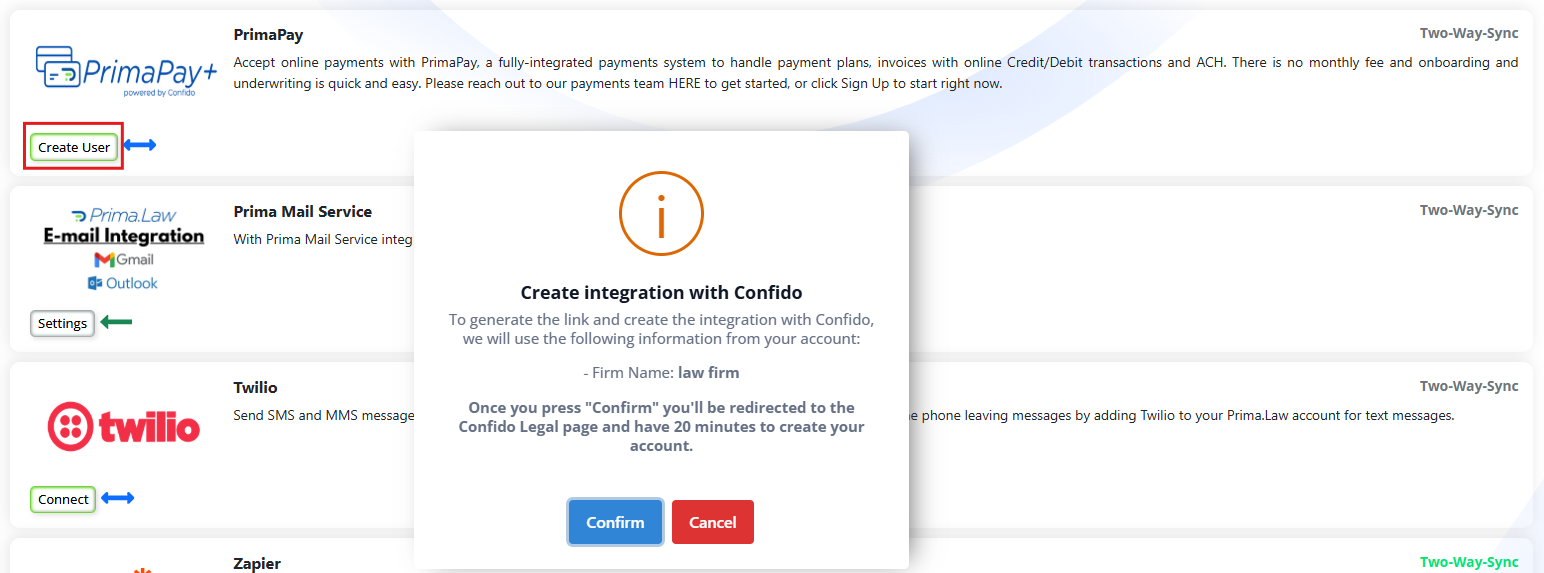
8) PrimaPay+: Applying, Activation, Rates, and Surcharging
PrimaPay+ enables payment processing inside Prima.Law via Confido Legal.

Apply for PrimaPay+
- Go to Administrator Panel → Integrations.
- Find the PrimaPay+ / Confido section.
- Click Create User.
- You’ll be taken to the Confido application page.
- Use the same email as Prima.Law or change it (your choice).
- Complete the application:
- You may be able to connect bank info via Plaid
- Or enter it manually
- Submit the application.
Once approved:
- You can connect/confirm PrimaPay+ settings inside Prima.Law.
- Payment methods and payment processing become available for invoices, payment plans, and the Client Portal.
Rates
- Credit/Debit card: 2.95%
- ACH / Bank transfer: 1% (capped at $30)
- Monthly fee: none
- Confido billing cadence: fees are charged every two months
Surcharging (Optional)
Surcharging availability depends on the state and your configuration.
You can enable it:
- Through Confido settings, or
- By contacting Confido support
If surcharging is enabled:
- Clients are informed during payment (including Client Portal payments)
9) Common Setup Notes and Best Practices
- Add your bank accounts first (Operating/Trust) before billing setup.
- Set invoice terms and rates before you start invoicing heavily.
- Decide early who will approve invoices (admins only vs billing staff).
- Assign the case to the correct client and share it in the Client Portal if you want clients to view/pay invoices there.
- Use PrimaPay+ if you want everything in one place (billing + payment processing + portal payments).
Important Note
Depending on the level of access of each user (Admin vs Non-admin), users wil be able to visualize account balances while performing actions such as recording a payment or creating a new Invoice. ONLY ADMIN LEVEL USERS ARE ABLE TO SEE ACCOUNT BALANCES.
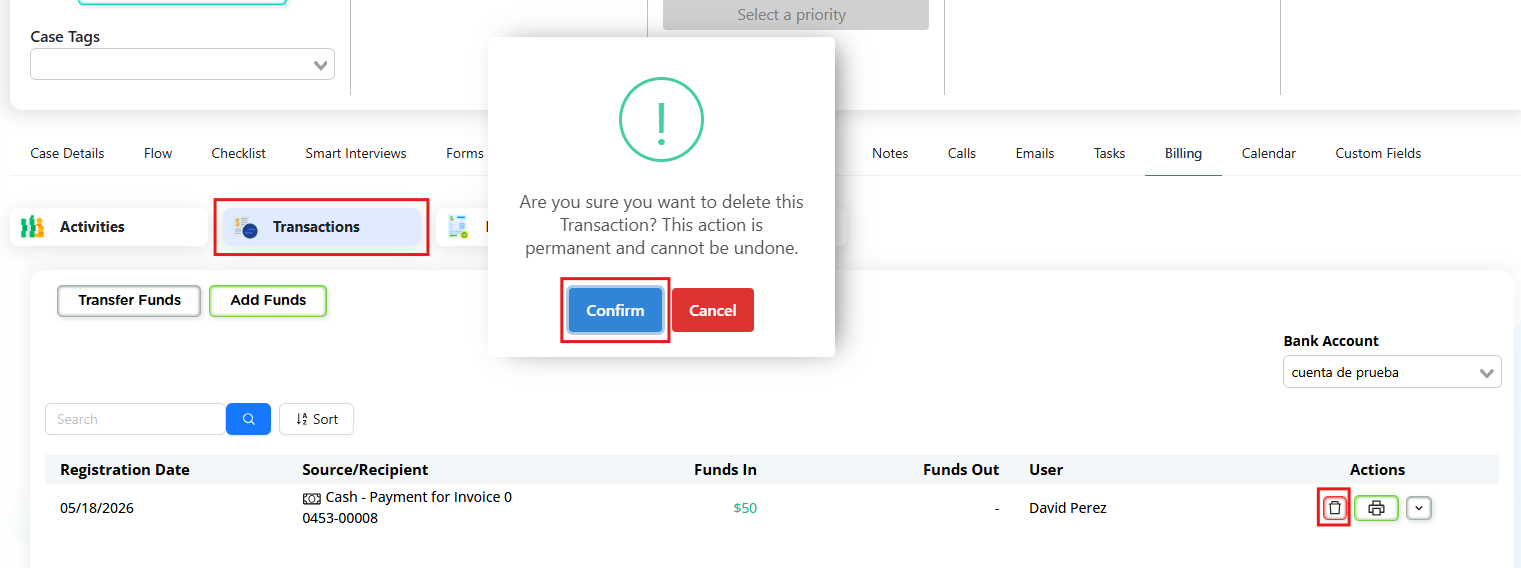
Managing Payments: Voiding, Refunding, and Deleting Transactions
Prima.Law allows users to remove payments, but the available actions depend on whether the payment was full or partial and on the current status of the invoice.
Voiding or Refunding a Full Payment
When an invoice has been fully paid and is still in a payable status, you can void the payment by using the Actions menu on the invoice line.
- Click the Actions button (downward arrow) next to the invoice.
- Select Refund.
- This option is appropriate when the full payment needs to be reversed.
If the invoice has already moved to a Paid status, the only available action is Refund, since paid invoices cannot be voided.
Deleting a Partial Payment
If the payment was partial, you do not need to void or refund the entire invoice.
- Go to the Transactions tab.
- Locate the specific payment transaction.
- Use the Delete action to remove only that individual transaction.
This removes the partial payment without affecting the rest of the invoice or its remaining balance.
Summary
- Full payment + invoice still payable: Use Actions → Refund to void the payment.
- Full payment + invoice already Paid: Only Refund is available.
- Partial payment: Delete the specific transaction from the Transactions tab.
Need Help?
If you have questions about billing configuration, PrimaPay+ approval, or processing rates, contact support at support@primalaw.