Inviting Clients & Permission Management
Step 1: Activate the Client Portal for a Contact
- Open the client’s Contact Page.
- In the General Information section (top-left corner), locate the Client Portal toggle.
- Turn the toggle ON.
What happens next:
- An email is automatically sent to the contact.
- The email contains a “Go to Client Portal” button.
- The client does not need to register or create credentials.
- Clicking the button logs them in automatically using embedded credentials.
Important:
- Only this specific contact receives access.
- Access is tied to the email address assigned to that contact.
Step 2: Customize the Portal Login Page (Admin Only)
If you are an administrator, you can brand the login page.
- Go to the Administrator Panel.
- Open the Client Portal tab (next to Reports).
- Upload:
- Landing page image
- Main image
- Firm logo
- Follow the recommended image dimensions to ensure proper display.
Your branding will appear on the login page and inside the portal.
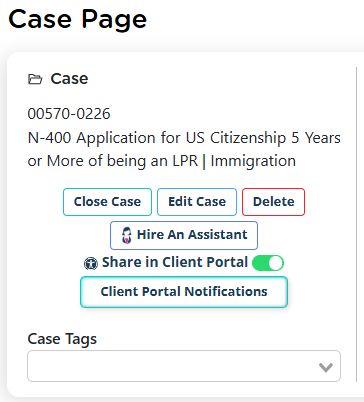
Step 3: Share a Case with the Client
Activating the portal alone does not give access to case information.
To share a case:
- Open the Case Page.
- In the General Information section (below the case name), locate the toggle labeled Share in Client Portal.
- Turn it ON.
The client will receive a notification that a case has been shared.
If multiple cases are shared:
- The client can switch between them using the dropdown menu at the top of the portal.
- It is recommended to share one case at a time to keep things simple.
Managing Permissions Summary
- Portal access is granted per contact.
- Case access is granted per case.
- You control visibility of:
- files
- forms
- invoices
- notes
- Smart Interviews
Everything must be explicitly shared to be visible.
Customizing Client Portal Notifications Per
You can control who receives client portal notifications on a per-case basis directly from the case page.
To configure this:
- Open the specific case (not the contact)
- On the top left corner of the case page, click Client Portal Notifications
- Select the user(s) who should receive notifications by checking their names
- Save your selection
You can choose one user or multiple users from your tenant to receive these notifications.
What Notifications Are Included
The selected users will receive notifications for client activity within that case, such as:
- File uploads
- Completed Smart Interviews
- Form edits or updates
Important Note
These notification settings are case-specific, meaning they must be configured individually for each case. Changes made here will only apply to the selected case and will not affect other cases or contact-level settings.