
Clio Integration Guide
Part 1: Enabling the Clio Integration
Step 1: Access the Integrations Tab
- Click your name in the top-right corner.
- Select Administrator Panel.
- Click the Integrations tab (sixth tab from left to right).
- Scroll to the bottom of the page.
- Locate the Clio Integration section.


Step 2: Connect to Clio
- Click the green Connect button.
- You will be prompted to enter your Clio Manage credentials.
- Log in using your Clio credentials.
- Grant permission for Prima.Law to access:
- Contacts
- Matters
- Custom fields
After authentication:
- You may be prompted to log out of Prima.Law.
- Log back in.
- Return to Administrator Panel → Integrations → Clio.
Step 3: Review Integration Options
Once connected, you will see:
- Disconnect
- Custom Fields
- Generate Custom Fields
- Two-Way Sync checkbox
Part 2: Managing Custom Fields
Importing Custom Fields from Clio
- Click Custom Fields.
- You will see all custom fields from Clio.
- Select the fields you want to import using the checkboxes.
- Click Import.
If a field has already been imported:
- It will display as Imported.
- The Import button will not appear.
You can:
- Sort by name, type, or options.
- Search by field name.
- Bulk import multiple fields at once.
Both:
- Contact custom fields
- Matter custom fields
can be imported and will appear in Prima.Law accordingly.

Step 4: Enable Two-Way Sync (Recommended)
On the right side of the Clio integration section, you will see a checkbox labeled:
Two-Way Sync
If enabled:
- Contacts created in Prima.Law will sync to Clio.
- Matters created in Prima.Law will sync to Clio.
- Updates made in either system can synchronize.
We strongly recommend enabling Two-Way Sync for a seamless experience.

Part 3: Importing Contacts from Clio
Important:
You cannot import matters alone. Matters are tied to contacts.
You must import the contact first.
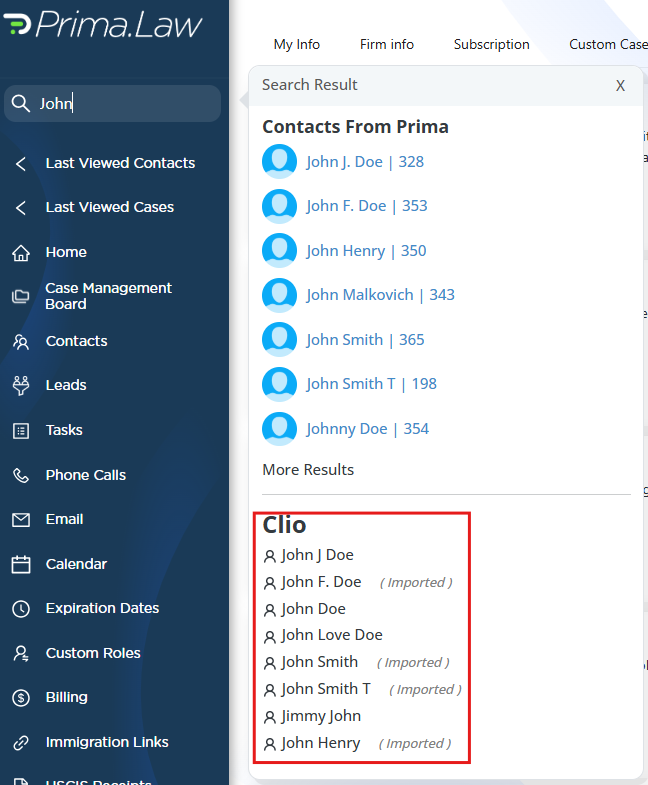
Step 1: Search for a Contact
- Go to the Prima.Law search bar.
- Type the contact’s first name (or first and last name).
- Do NOT press Enter immediately.
You will see:
- Prima.Law contacts (top list)
- Clio contacts (bottom list)
If a contact has already been imported:
- It will show (Imported) next to the name.
Step 2: Import the Contact
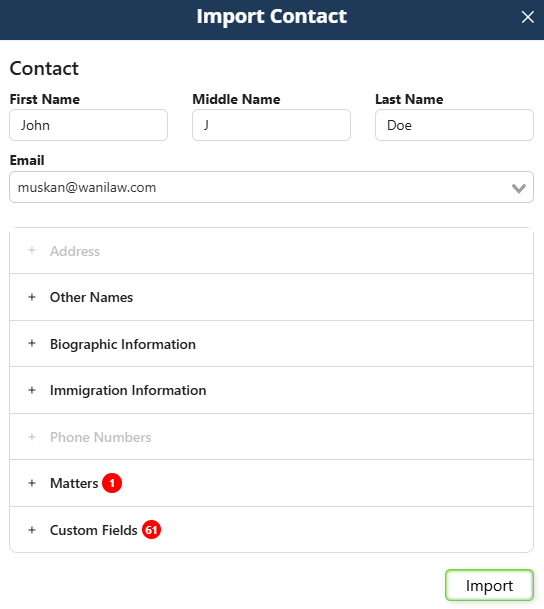
Click on a Clio contact that is not marked as imported.
The Import Contact interface will appear.
You will see:
- First name, middle name, last name
- Addresses
- Other names
- Biographic information
- Immigration information
- Phone numbers
- Matters
- Custom fields
You can:
- Expand each section.
- Edit the information before importing.
- Choose which matters to import.
- Modify case names before import.
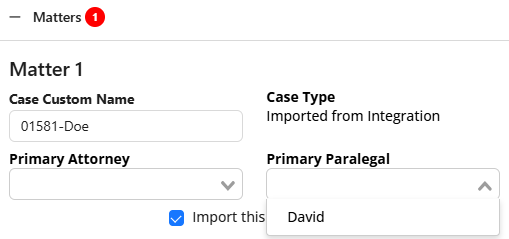
Important: Assigning Cases Properly
When importing matters:
- The case type will default to Imported from Integration.
- You can modify the case name before importing.
- You must assign:
- At least one attorney or paralegal.
You can also choose whether or not to import each matter.
Step 3: Complete the Import
Click Import.
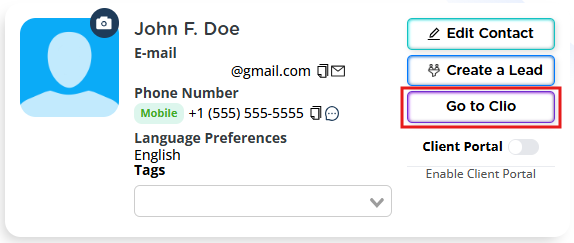
You will be redirected automatically to the imported contact page.
You will also see a Go to Clio button on the contact page for quick access.
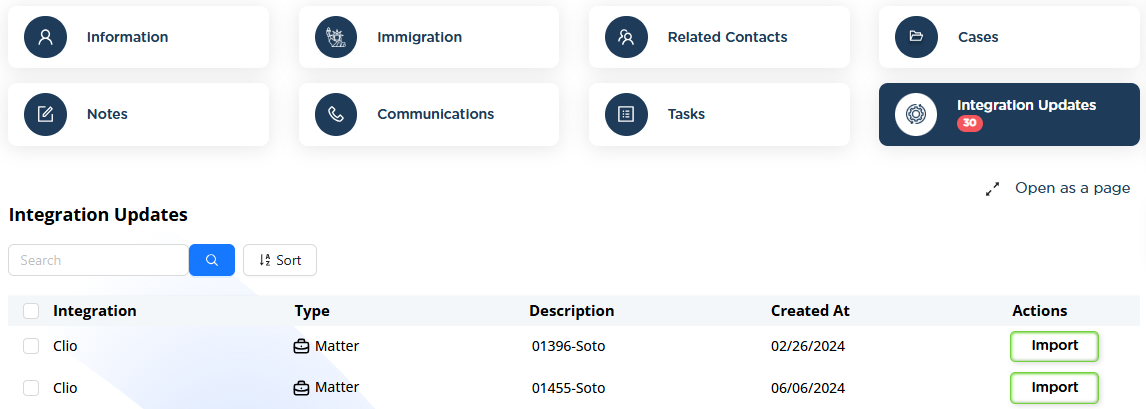
Integration Updates Tab
On the contact page, next to the Tasks tab, you will see:
Integration Updates
If changes are made in Clio:
- Notifications will appear here.
- You can choose whether to import those updates.
Part 4: Assigning the Correct Case Type
Any imported matter will initially have the default case type:
Imported from Integration
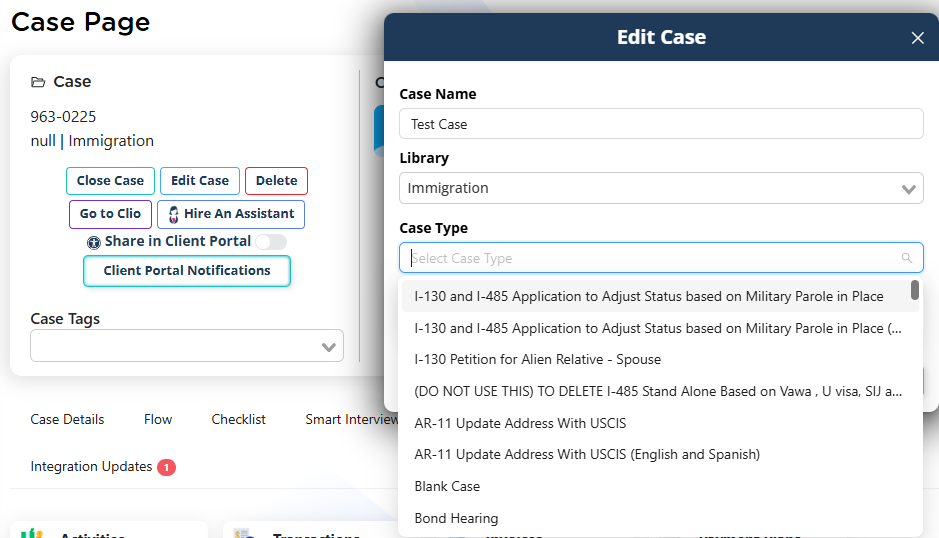
Before beginning casework:
- Open the imported case.
- Click Edit Case (below the case name).
- Select the appropriate library (Immigration, California, etc.).
- Choose the correct case type from the dropdown.
- Save changes.
Important:
Changing the case type resets checklist items and forms.
Always assign the correct case type before beginning work.
Once assigned properly:
- The checklist will populate.
- The forms list will populate.
- The workflow becomes fully functional.
Part 5: Syncing Back to Clio
With Two-Way Sync enabled:
- Tasks created in Prima.Law sync to Clio.
- Notes sync to Clio.
- Contact updates sync to Clio.
Additionally:
Each form has a Save to Clio button.
You can:
- Send individual forms to Clio.
- Push updated form data into Clio records.
You can also use the Go to Clio button from the contact page to quickly access the matching Clio record.
Who Is This Integration For?
This integration is ideal for firms that:
- Already use Clio.
- Want advanced immigration or California form libraries.
- Want powerful autofill and reverse autofill tools.
- Want to maintain synchronization between both systems.
Important:
Prima.Law does not require Clio to function.
Prima.Law is a complete case management and forms solution on its own. The Clio integration is optional and designed to enhance workflows for firms that already operate in both systems.
Summary
To use the Clio integration:
- Enable it from Administrator Panel → Integrations.
- Authenticate with Clio credentials.
- Import custom fields.
- Enable Two-Way Sync.
- Import contacts (matters follow).
- Assign the correct case type before starting work.
- Use Save to Clio and Go to Clio for synchronization.
This integration provides a powerful bridge between Clio’s practice management and Prima.Law’s advanced form automation system.