
Creating & Managing Contacts (Individual vs. Company)
What a Contact Represents in Prima.Law
A contact is not tied to a single case. Instead, it acts as a reusable data record that can support multiple cases over time. Once information is stored on a contact, it can be reused across:
- Current and future cases
- Related family member cases
- Employment-based cases
- Form autofill and Smart Interviews
Because contacts function as a long-term data source, keeping them accurate and up to date pays off immediately and in the future.
Creating a New Contact
You can create a contact from multiple places in Prima.Law, but the primary method is from the Home page.
Accessing the New Contact Interface
When you log in, you will see a plus (+) button in the top left menu of the Home page under the Contact section. Clicking this button opens the New Contact interface. From here, you choose whether the contact will be created as an Individual or a Company.
You may also see recently created contacts on the Home page or access recently viewed contacts from the left-hand sidebar, but creation always follows the same flow.
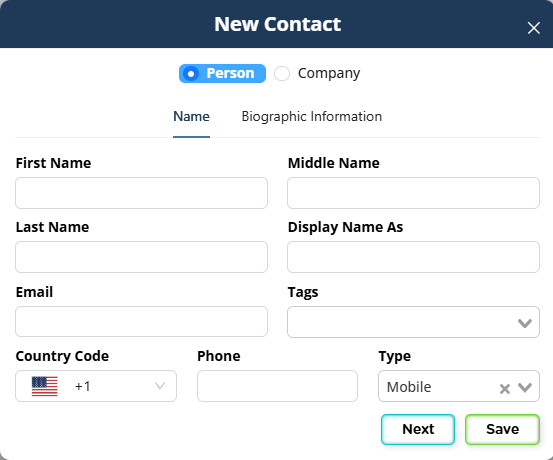
Individual Contacts
Individual contacts are used for most people in the system, including:
- Clients
- Beneficiaries
- Petitioners
- Family members
- Company representatives
- Employees
Basic Information (Name and Contact Details)
The first section of the New Contact interface focuses on identifying information:
- First name (required)
- Last name (required)
- Middle name (optional)
- Display name (optional, useful if you use internal IDs or naming conventions)
You can also add:
- Email address, which is used for form autofill, email integration, and client portal access
- Phone number with country code and phone type (mobile, home, work, etc.)
- Tags, which allow you to filter and organize contacts later
If you have the Clio integration enabled, you may choose whether the contact should sync to Clio. Syncing is optional, and Prima.Law works fully on its own without Clio.
Biographic Information
The biographic section allows you to store personal data such as:
- Date of birth
- Sex
- Social Security number
- Language preferences
- Communication preferences
This information is optional, but entering it early helps reduce repetitive data entry later. Data stored here feeds directly into forms and Smart Interviews.
Saving the Contact
Once you click Save, you are automatically taken to the contact’s main page.
Company Contacts
Company contacts are used in employment-based, religious, and organizational cases. Churches, businesses, and employers are all created as company contacts.
Company-Specific Information
When you select Company in the New Contact interface, you will see fields specific to organizations, such as:
- IRS tax ID
- Business type
- NAICS code
- Year established
- Total number of employees
- Number of U.S. employees
- Gross annual income
These fields do not appear for individual contacts and are designed specifically to support employment-based filings.
After saving, company contacts have a different layout than individual contacts. This is expected and intentional since companies do not require personal biographic data.
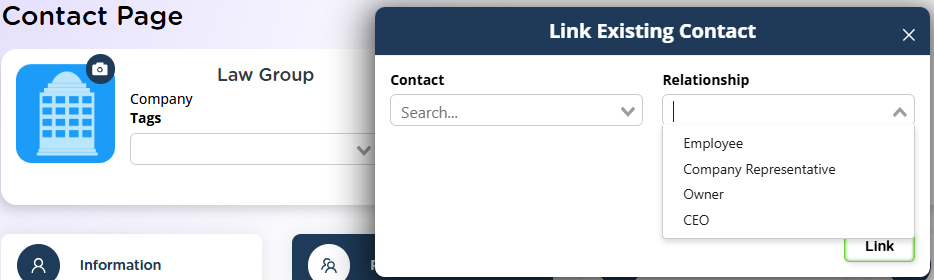
Relating People to a Company
One of the key advantages of company contacts is the ability to relate people to an organization. From the Related Contacts tab on the company contact, you can create or link:
- Company representatives
- Owners
- CEOs
- Employees
Each relationship is explicitly defined when linking the contact.
How Company Relationships Affect Case Access
Proper setup determines who can access which cases:
- If cases are opened under employees, and a company representative is related to the company, the representative can access all employee cases through the client portal
- If cases are opened under the company itself, only the company representative will have access, not individual employees
In most scenarios, opening cases under employees provides greater flexibility, better data collection, and smoother collaboration.
To enable shared access, the client portal must be activated and cases shared for the relevant contacts.
The Contact Page Overview
After a contact is created, you are taken to the Contact Page. This page acts as the central hub for everything related to that contact.
At the top of the page, you will see:
- Contact name and basic details
- Email and phone numbers
- Address (if available)
- An Edit Contact option
- A Client Portal toggle
- A link to Clio (if integrated)
Important Notice Panel
On the right side of the Contact Page is the Important Notice panel. This notice appears both on the contact page and any related case pages.
It is used to flag critical information, such as:
- Sensitive handling instructions
- Communication restrictions
- Case-specific cautions
Notices can be color-coded:
- Green for normal
- Orange for caution
- Red for urgent or critical
Pending tasks related to the contact are also displayed here.

Contact Page Tabs
Information Tab
This tab stores personal and background data. Subsections include:
- General
- Bioinfo
- Passports
- Emails
- Addresses
- Phones
- Employment
- Marriage history
- Family members
- Education history
- Criminal history
- Custom fields (administrator-managed)
You are not required to fill everything out manually. Data can also be populated through case tools and Smart Interviews. However, entering known information here ensures consistency across all cases.
Marriage history and family member entries allow you to create related contacts directly from those records.
Immigration Tab
This tab stores all immigration-related data, including:
- Immigration status
- Travel history
- U.S. entries
- Visa history
- I-94 data
- EOIR information
- Work permits
- Priority dates
- Advance parole
Related Contacts Tab
This tab links contacts together. You can:
- Link existing contacts
- Create new contacts and automatically relate them
- Define relationship types (spouse, child, employee, company representative, etc.)
Cases Tab
This section lists all cases associated with the contact, regardless of status. From here, you can:
- Open new cases
- Review existing or closed cases
- Download a CSV of case history
Notes Tab
Notes allow you to log internal information such as:
- Activity summaries
- Case-related observations
- Internal reminders
Notes can be linked to specific cases or remain contact-only.
Communications Tab
This tab consolidates all communication:
- Calls (logged manually or set as pending reminders)
- Text messages (requires Twilio integration)
- Emails (requires email integration)
Email integration allows sending, replying, attaching files, searching, and printing emails directly from the contact page.
Tasks Tab
Tasks help track follow-ups and work items. Tasks can:
- Be assigned to users
- Be linked to cases or contacts
- Include priority, due date, status, and tags
Integration Updates Tab
If integrations are active, this tab shows updates that can be synced back into Prima.Law.

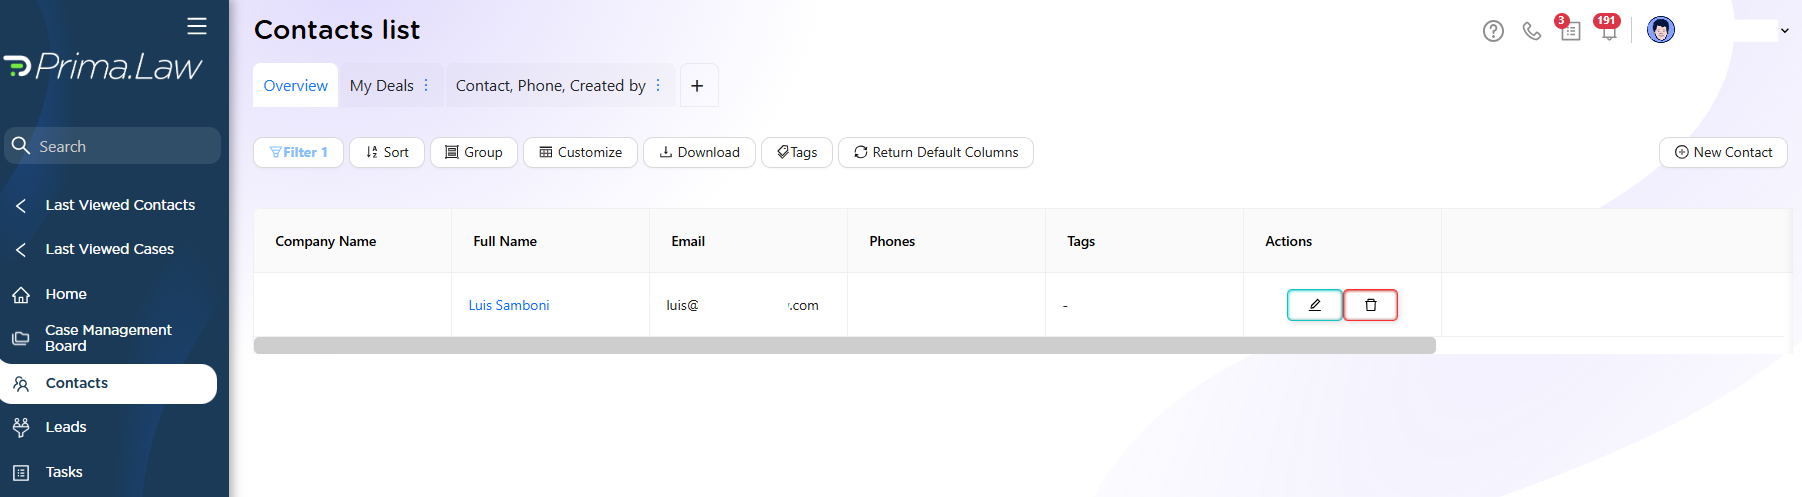
Managing Contacts from the Contacts List
The Contacts section in the left sidebar opens the full contact list. This list functions like other lists in Prima.Law and is highly customizable.
You can:
- Create multiple saved views
- Filter by any column (name, tags, language, phone, company, etc.)
- Sort and group contacts
- Show or hide columns
- Export the list as a CSV
- Reset to default views
Views can be created using the plus (+) button at the top of the list. This allows you to experiment with layouts without affecting saved configurations.
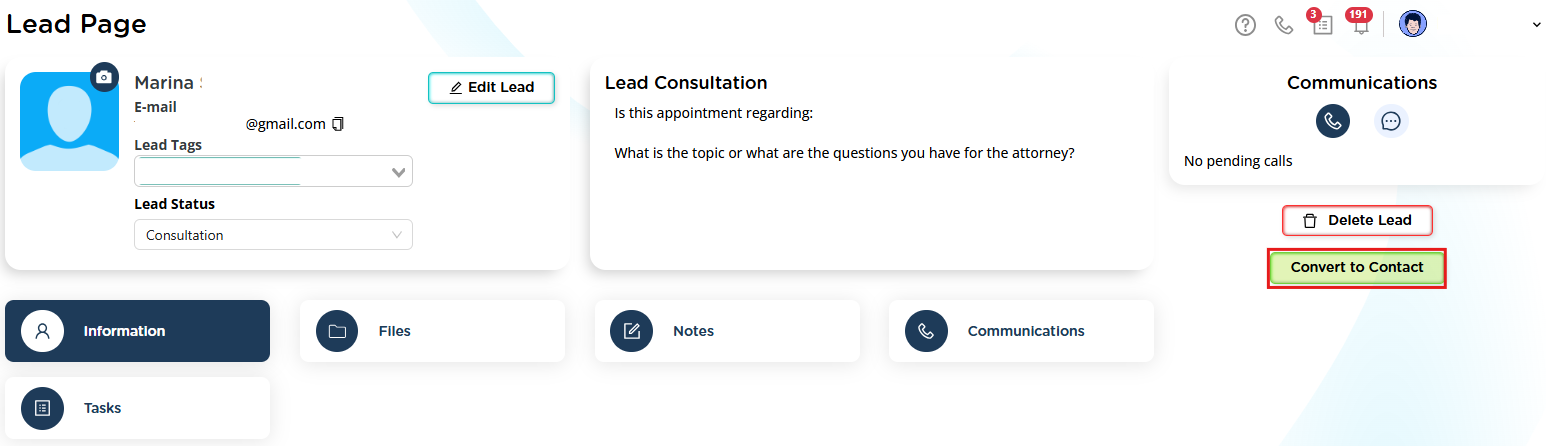
Creating Contacts from Leads
Contacts can also be created by converting a lead.
When a lead is ready to become a client, open the lead page and select Convert to Contact. This action:
- Creates the contact automatically
- Transfers notes, tasks, and communications
- Optionally creates a case
This approach eliminates duplicate work and keeps the workflow efficient.
Best Practices
- Treat contacts as long-term data records, not one-time entries
- Enter known information early to reduce repeated data requests
- Use related contacts to connect families and organizations
- Prefer case tools and Smart Interviews over manual data entry
- Keep contact information current to ensure accurate form autofill